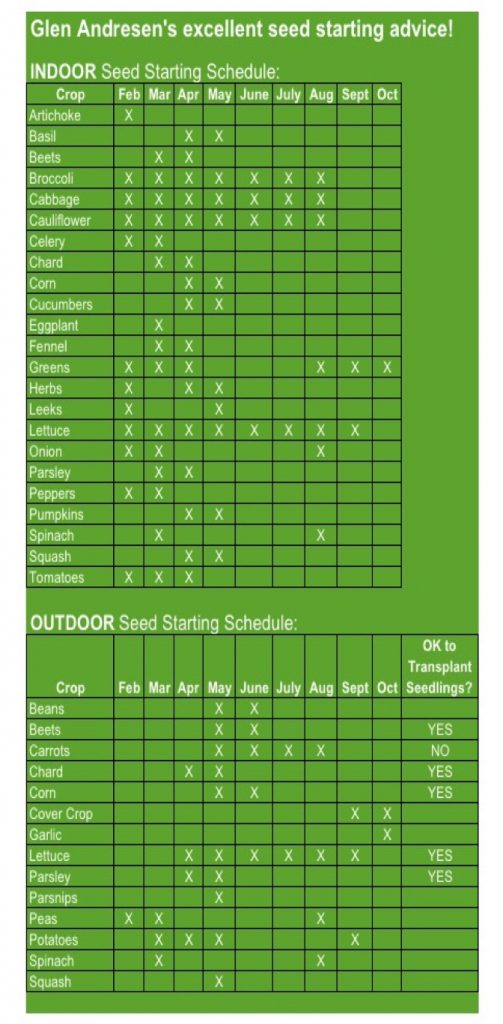
Got questions about seeds? Here are some answers! Check below for good basic seed starting information and techniques.
- Which seeds do I plant now, before the last frost?
- Which seeds do I plant after the last frost?
Click here to take a look at our Seed Starting Schedule.
Fresh Seeds Work Best
Major tip for success – start with fresh seeds! The back of your seed packet should have an expiration date. If the date has passed, you may have additional difficulty getting the seed to sprout. It is amazing how much more successful you will be with current seed. If the seed is past it’s expiration date, you don’t need to throw it away. Just know that you will most likely have a lower percentage that germinate.
Seed Starting Mix
When starting seeds inside, the planting medium you use should be designed specifically for that purpose. Potting soil is generally too coarse to start most seeds in and some mixes have fertilizer added, which is not appropriate for newly sprouted seeds. Seed starting mix is the proper texture and has the right amount of moisture retention. If your seeds stay too wet, they will rot. If they dry out too fast, they will either not sprout or the newly sprouted seeds will wither and die.
Extra tip – soil should be moistened prior to loading the pot with soil and seed.
Proper Planting Depth
Seeds come in all sizes. The size of the seed partially determines how it should be planted. Small seeds generally should be sown on top of the soil and lightly tamped, to settle them in. Large seeds should be covered by seed starting mix. Look on the back of the seed packet to determine the proper depth of planting.
Read the Back of the Package
Beginners – choose seeds that have a short sprouting time, less than 20 days.
Experienced seed starters – if there is a special variety you would like to try that has a long sprouting period, go for it. However, remember, it will take patience and care, waiting sometimes, 2 months for a seed to germinate.
Good tip – Larger seeds, like nasturtium, can be nicked and/or soaked overnight to speed up germination.
Seedling Heat Mat
Seeds require the proper soil temperature to sprout. The back of the seed packet will say the temperature needed for best results.
Another trick to getting seeds to sprout quickly and thoroughly is to use a source of bottom heat. A seedling mat warms the soil to the correct temperature which promotes sprouting. This is especially helpful in early spring, when inside temperatures are low.
Plenty of Light After Sprouting
Once they have sprouted, seeds require the proper amount of light to grow. Seeds can be sprouted in the dark, but once they do, they need light to grow strong stems and photosynthesize to feed themselves.
Many times, gardeners will sprout seeds on a windowsill thinking the light coming in the window will be enough for new seedlings. If growth is tall and spindly, the plant is not getting enough light. A simple fluorescent tube fixture placed as close as possible to the top of the plants will provide enough light to grow strong stemmed plants.
Transplanting Tips
Harden off seedlings by exposing them to the outdoors slowly. Start with one hour outside the first day and increase gradually for a week.
Handle seedlings carefully. Keep as much soil around the roots as possible.
Once you start growing plants from seed, it’s hard to stop!
If you have more questions, come on into the store for advice.
Seed Starting Schedule – Inside & Outside


